
The other day I took a look at what's needed to add channel art to my YouTube One Channel page. It wasn't long before I was confused (it sometimes doesn't take much). When you sort it out it's not too bad, though. You need:
What follows is a simple how-to on working with a template and conforming to requirements for image dimensions. Note that I'm working in GIMP -- an application that is fairly new to me -- because it's open source (Windows download page). While open source is free to use, it's only fair that you contribute to the project in some way. Because I'm a new user of GIMP, I don't know all of the features and how to make them work. So here goes.
When you open newly-installed GIMP, three panels appear. The middle pane is the one with the menus. It's best to start a new image with the dimensions and resolution of the final product. For YouTube One set the dimensions to width 2560 px, height 1440 px. That's pretty big, so set the resolution at 72 pixels per inch (under advanced). I prefer a resolution of 96 or 150 ppi, because the final product is sharper, but this will be a large file because of the image dimensions, so best to stick to 72 ppi, which is the default for most web images. To save yourself some work later, set the background color to black, GIMP's default foreground color (remember this image may be shown on a TV). Set the view to 33% or 50% to see the whole image.
Always remember, Ctrl+z is your very best friend.
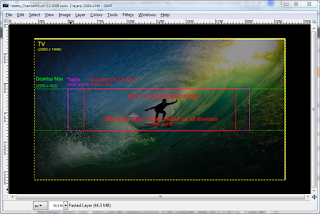
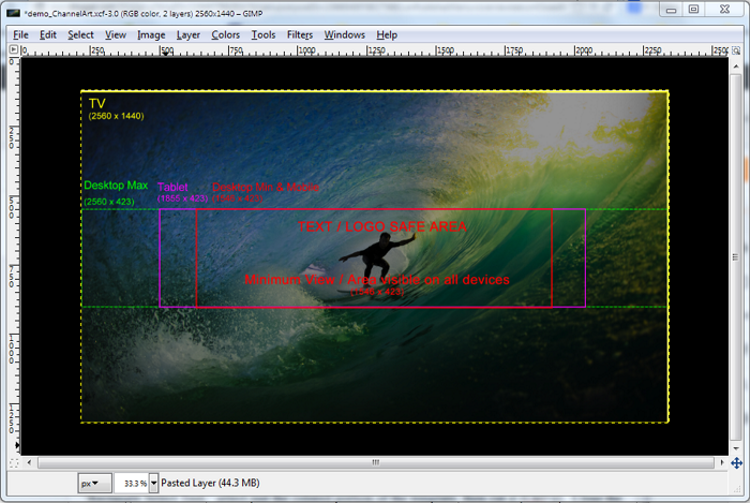
Download the template from the Channel Art guidelines, then open it with GIMP (File/Open). Using the Toolbox/"Rectangle Select Tool" (left panel, top), select just the colored portion of the template, then cut it (Ctrl+z). Close the guidelines image without saving, then paste the cut image into your new one. It will automatically be centered and appear in the Layers list (right panel, top) as a "Floating Selection." Right click on it and select "To New Layer." This will be your reference for the placement of the image you want to show in your YouTube channel. Currently this work looks like this:
Now you need some content. One of my favorite resources is Hubble images, where I selected the view of M106 wallpaper, 2048 X 1536 (1.2 Mb). This one was selected because it has a compelling center image and not a lot of 'noise' (small details that distract the viewer's eye). Note that the dimensions of this image differ from the one I'm working on, in other words it won't fit.
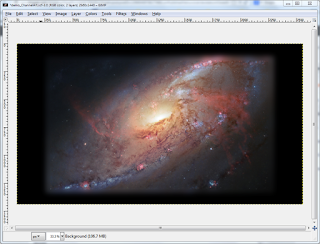
Open this new image with GIMP, select it all (Select/"All"), cut it and paste it into the work. In the Layers list right click on "Floating Selection" and set it "To New Layer." Being sure you have "Pasted Layer #1" selected, choose the Toolbox/"Move Tool" (five buttons down) and position the new image so that the portion you want in the center is in the center.
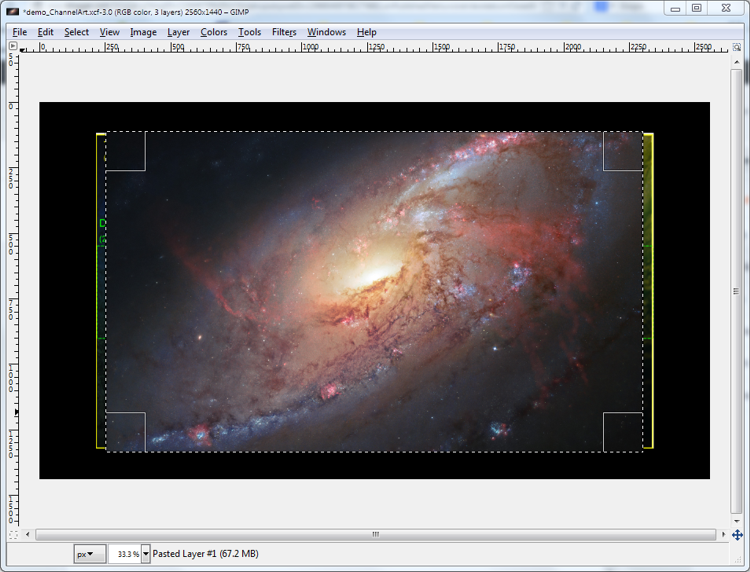
Because the image doesn't fit correctly, it's necessary to crop and blend it. Being sure that you have the correct layer selected, use the Toolbox/"Rectangle Select Tool" to select the size you want, then use Layer/"Crop to Selection." Remove the selection by choosing Select/"None." Now we have this:

Now to blend the content with the background. Hide the template by clicking on the eye next to "Pasted Layer" in the Layers list. Re-select the content layer (Pasted Layer #1) and drag it down to just above the background. With Layer#1 still selected, right-click and choose "Merge Down." Using Toolbox/"Rectangle Select Tool," select an area within the layer. (I like to use View/"Show Guides" and drag the guides from the ruler for reference.) What we have now is shown below.

Invert the selection with Select/"Invert." By clicking Filters/Blur/"Gaussian Blur" you will get a dialog for setting the blur parameters. I tried setting it to 75px and that worked well. Turn the guides off by deselecting View/"Show Guides" and remove the mask with Select/"None." This is the final image.
There's still text to be added and the work needs to be exported. Because this post is so long, these topics will be addressed in the post on Monday. If you have questions or want to advise on better ways to use GIMP, please be sure to leave a comment.
-- Marge
- an image that's formatted to show well across displays in wide variety of sizes-- from TV to mobile phone.
- a Google Drive account because YouTube One wants to get its image from online storage (15 Gig of free storage is available).
There was an error!Be that as it may, setting up the image is fairly complicated, so a head start would be good. Be sure to read the guidelines and get the template first.
Details:
The feature you requested is currently unavailable. Please try again later.
What follows is a simple how-to on working with a template and conforming to requirements for image dimensions. Note that I'm working in GIMP -- an application that is fairly new to me -- because it's open source (Windows download page). While open source is free to use, it's only fair that you contribute to the project in some way. Because I'm a new user of GIMP, I don't know all of the features and how to make them work. So here goes.
When you open newly-installed GIMP, three panels appear. The middle pane is the one with the menus. It's best to start a new image with the dimensions and resolution of the final product. For YouTube One set the dimensions to width 2560 px, height 1440 px. That's pretty big, so set the resolution at 72 pixels per inch (under advanced). I prefer a resolution of 96 or 150 ppi, because the final product is sharper, but this will be a large file because of the image dimensions, so best to stick to 72 ppi, which is the default for most web images. To save yourself some work later, set the background color to black, GIMP's default foreground color (remember this image may be shown on a TV). Set the view to 33% or 50% to see the whole image.
Always remember, Ctrl+z is your very best friend.
Download the template from the Channel Art guidelines, then open it with GIMP (File/Open). Using the Toolbox/"Rectangle Select Tool" (left panel, top), select just the colored portion of the template, then cut it (Ctrl+z). Close the guidelines image without saving, then paste the cut image into your new one. It will automatically be centered and appear in the Layers list (right panel, top) as a "Floating Selection." Right click on it and select "To New Layer." This will be your reference for the placement of the image you want to show in your YouTube channel. Currently this work looks like this:
Now you need some content. One of my favorite resources is Hubble images, where I selected the view of M106 wallpaper, 2048 X 1536 (1.2 Mb). This one was selected because it has a compelling center image and not a lot of 'noise' (small details that distract the viewer's eye). Note that the dimensions of this image differ from the one I'm working on, in other words it won't fit.
Open this new image with GIMP, select it all (Select/"All"), cut it and paste it into the work. In the Layers list right click on "Floating Selection" and set it "To New Layer." Being sure you have "Pasted Layer #1" selected, choose the Toolbox/"Move Tool" (five buttons down) and position the new image so that the portion you want in the center is in the center.
Because the image doesn't fit correctly, it's necessary to crop and blend it. Being sure that you have the correct layer selected, use the Toolbox/"Rectangle Select Tool" to select the size you want, then use Layer/"Crop to Selection." Remove the selection by choosing Select/"None." Now we have this:
Now to blend the content with the background. Hide the template by clicking on the eye next to "Pasted Layer" in the Layers list. Re-select the content layer (Pasted Layer #1) and drag it down to just above the background. With Layer#1 still selected, right-click and choose "Merge Down." Using Toolbox/"Rectangle Select Tool," select an area within the layer. (I like to use View/"Show Guides" and drag the guides from the ruler for reference.) What we have now is shown below.

Invert the selection with Select/"Invert." By clicking Filters/Blur/"Gaussian Blur" you will get a dialog for setting the blur parameters. I tried setting it to 75px and that worked well. Turn the guides off by deselecting View/"Show Guides" and remove the mask with Select/"None." This is the final image.

There's still text to be added and the work needs to be exported. Because this post is so long, these topics will be addressed in the post on Monday. If you have questions or want to advise on better ways to use GIMP, please be sure to leave a comment.
-- Marge
No comments:
Post a Comment