Pages

Showing posts with label YouTube. Show all posts

Monday, January 26, 2015

Art: some 2D animation for inspiration

image: artistic rendering of anime character Asuka Langley Soryu
Asuka Langley Soryu, sampaikini
***
There are so many ways to approach animation (a discipline/art form I'm trying to learn), that I find myself turning to works that I like for inspiration. In animation there's not only the artwork, but also storyline, voice, music, camera angles, and--maybe most important--motion and timing.

This one's my odds-on favorite. I love the sketchy, yet fluid style, transitions, now-you-see-it-now-you-don't effects and the song is lovely, too.
***
***

This one has a similar story, but very different style. Again I'm attracted to the wispy effects.
***
***

The backgrounds are really, really good in this film. And the story is fun--it reminds me of questing in an MMORPG.
***

***


This last film is a collection of scenes from a Japanese animated television series called "Neon Genesis Evangelion." In most of the animé/manga films I've seen the artwork is outstanding. If you'd like to get an idea of how dedicated its fans can be, here's a page listing the author's top ten favorite characters. The page will also give you an idea of the wide range in artistic styles. Keep in mind that some animé can be pretty riské by America's prudish standards.
***
***

To play these videos in sequence the playlist is available on YouTube.

-- Marge


Monday, December 15, 2014

Technology: Visions of holodecks


Researchers have used projected ultrasound to create floating 3D shapes that can be seen and felt in mid-air (Photo: University of Bristol), gizmag
***
Haptic is the magic word today, specifically haptic technology or haptics. At root the word means:
adjective: of or relating to the sense of touch, in particular relating to the perception and manipulation of objects using the senses of touch and proprioception--the reception of stimuli produced within the organism.
Tactile is a related term and a number of groups are working on making devices that offer tactile experience.

Researchers at the University of Bristol have coined the word ultrahaptics to describe their project. This article from gizmag, New ultrasound research creates holographic objects that can be seen and felt, describes their current efforts. Here's a video that explains more.
***
***

If you would like to track the University of Bristol's Interaction and Graphics (BIG) projects, here's the BIG home page URL.

Disney Research (Disney does research?) has a video about tactile rendering of 3D features on touch surfaces, from a project by the Pittsburgh research team. Their approach uses an electro-vibration based friction display. Here's the video published on the DisneyResearchHub channel.
***
***

Stuff, the magazine, reports on a prototype by Fujitsu that also uses ultrasonic haptic feedback, as does BIG's project.

Meanwhile MIT's Tangible Media Group is working on surfaces that actually change dimensionally. This video was published about six months ago on the MIT Media Lab channel.
***
***

The metaverse awaits.

-- Marge


Wednesday, December 03, 2014

DIY: Gift giving--sometimes the magic is in presentation

image: Gift-wrapping idea from Babble
Pom pom yarn embellishments, Babble
***
Once I bought a Wacom Bamboo tablet and, when I received it, I was amazed and delighted by the way it was packaged. A simple black box opened like a book to a one-layer, parchment-like tissue, folded over just so. Inside the tissue was nested the tablet. The whole package was so elegantly done that I felt I'd received a gift from Wacom.

The gift you're giving doesn't have to be expensive, and if it isn't, the way it's wrapped and presented can make it seem so. (Learning enough about the receiver to know what to give helps.) WikiHow has a good article about how to give a gift unconditionally. Babble gives 18 Creative Ways to Give Cash & Gift Cards (Leading image link is broken, but slideshow works well).
***
image: idea for giving money as a gift from Babble
In case of emergency, Babble
***

Some tips for wrapping your gift well can be found at these sites. The Container Store offers a PDF for download that gives Tips for Perfect Gift Wrapping. Lushome has some unique presentation ideas that look a bit like a lot of work, but they may trigger some ideas for more manageable projects.

According to an article published at Today,
The Japanese equate wrapping a gift with “wrapping the heart,” so every gift is marked by thoughtfulness and consideration, both for the object housed within the container or wrapping, and for the recipient of the gift. Bringing seemingly start [stark?] contrasts into harmony — like yin and yang — is central to the idea of any presentation. Rusticity and refinement, the transient and the eternal, the earthy and the sublime: such disparities are made evident — and rendered compatible — in choices of combinations of papers and ties that both emphasize and luxuriate differences in texture as well as, perhaps differences in color or pattern. A crinkled paper lashed with knotted cord, for example, reflects that approach.
The video below, posted by Paper Guru, shows how to wrap a gift with kimono pleats, a hand-tied bow, and a heart-shaped note card.
***
***

-- Marge


Monday, December 01, 2014

Humor: Some Christmas heresy (and a little music)

Wiggy!Wikimedia
***

Christmas fast approaches and that means shopping. Why is that?, you may ask.  Let Cracked tell you.
***
***

Don't bother to shop for the college students and grads with their huge student loans on your list, just send money and maybe a card. College Humor says so.
***
***

Mr. Bean, however, does get into the spirit of Christmas.
***
***

-- Marge


Wednesday, August 20, 2014

DIY: YouTube channel art, part 3

image: screenshot of water from Landmark Game
procedural water, Landmark Game
***
Adding channel art to your YouTube channel can be a challenge. To address the different sizes of displays that YouTube can be viewed on--cell phone to TV--it's necessary to upload a very large image. Google suggests 2560 X 1440 pixels. At 72 dpi an image that size is about 3.5 Megabyte. The upload window at YouTube says that 2 MB is the maximum file size. What to do?

By using the service available at Image Optimizer I was able to compress my image to a little over 1 MB. The process is easy. Upload your picture, type in the dimensions desired for the result (in this case 2560 width and 1440 height), and click the Optimize Now! button. When the optimizing is done, download the result, now renamed with the term "Optimized-" added to the original filename. You can also download the Image Optimizer. BTW, it's always a good idea to scan downloads for viruses. Remember to donate, if you take advantage of the service. (Note that their site currency is British Pounds (GPB) and at today's rate 5£$8.54.)

Then upload your optimized image to YouTube.

There is a hitch in that different devices will show different parts of the image. Images that have the main feature oriented horizontally and centered will work best. In my case the image--a screenshot of Moon and water from Landmark Game--is oriented vertically and the Moon is not visible on the YouTube webpage or a cell phone. You can see what I mean by visiting my channel,

To get to the page that permits you to add channel art, browse to the Home page of your channel and click Add channel art near the top of your channel.  For more instructions and the guidelines, try Google's help page.

-- Marge

Monday, July 07, 2014

Animation: 2D, 3D or both

Since I'm working on learning animation, I go looking for good information on techniques, styles, and effects from time to time.  There is so much good work to see, especially on YouTube.  One thing I learned yesterday is to do the animated parts in 2D and the background in 3D.  Good to know.

Here Jazza of Draw with Jazza shows how he develops a character.
***
***

This delightful 3D animation, A Fox Tale, reminds me of Samurai Jack.
***
***

Below is a trailer for the CGI 2D/3D animation titled Colombiana; it's by Planet Jump Productions and published on YouTube by The CG Bros.  You may recall the movie Colombiana was a 2011 French-American action film co-written and produced by Luc Besson and directed by Olivier Megaton.
***
***

This last sample--Telescope--is a film with CGI elements.  It's included because it is arresting and just plain beautiful.
***
***

-- Marge


Wednesday, March 05, 2014

DIY: Recycle fashion

In January my local art gallery, IGCA (International Gallery of Contemporary Art), presented its yearly contemporary art/fashion show, called Object Runway.  Most of the entries in the show are made from recycled materials.  Everyone has a lot of fun at the show and the gallery exhibit that follows is quite popular.  Here's a pic of one of the entries (I hear the piece weighs 50 pounds):
***
image: Entry in Object Runway 5
Beth Daly Gamble wears a piece by Sheila Wyne made of 10,000 translucent drinking straws during the International Gallery of Contemporary Art’s 5th annual art fashion show Object Runway on Friday, January 23, 2014 at the Bear Tooth Theatre. BOB HALLINEN — Anchorage Daily News
***

As a do-it-yourself project, making clothing from recycled and found materials is only limited by your imagination and an eye for what may be usable.  Seems to me the only rules are that the piece be wearable--the model/wearer can move in it--and sturdy enough not to fall off.  Modesty may or may not be a consideration.  To me the best pieces flow or move in an appealing way with the wearer.

For inspiration here are two articles. One approaches the term recycle from the angle of re-purposing old fabrics with the idea of making a usable garment.
***
image: gown made from repurposed fabric
Rachel Wright, Green Diary
***

The other approaches recycle with the idea of making a visual statement--and something possibly wearable--from found materials.
***
image: garbage bag couture
Robin Barcus Slonina, "States of Dress," Brit+Co
***

In closing here's an interesting story from Wisconsin about one teen's prom dress, made from candy wrappers:
***
***

-- Marge

Monday, January 27, 2014

Figuring out what to do next


Most artwork, unlike the goddess Athena, doesn't spring fully formed from the creator's mind.  This is especially true of sequential art, such as film and animation.  For filmmakers the process of producing a full-length film is further complicated by managing film crews, props, and actors.  Planning ahead can save millions of dollars in production costs.  Storyboarding is the answer and technique many filmmakers turn to, as explained in this video about "Lord of the Rings" and how it was planned.

For a simplified look at storyboarding, take a look at this University of Houston page on its educational uses.  Storyboarding can produce some stunning artwork but usually it's sketched quickly, in response to the need at hand.  Closely related is concept art. I'm a big fan of the artwork found in Guild Wars 2; here's a sample.
***
image: concept art from Guild Wars 2
Concept art, Guild Wars 2
***

As you can see, video games as well as film use storyboarding. The site Game Design Schools has a short, but informative article, "Video Game Storyboard."

For a nuts and bolts treatment of storyboarding -- especially on camera shots, angles, and movement -- take a look at Brian Lemay's page on storyboarding basics.  At one point on the page he says:
I had a course when I went to college called "Visual Language". It wasn't about storyboarding but rather how we interpret visual input through our eyes in everything we look at. This visual input is a language all it's own. Like any other way of learning a language we need to start with the basic building blocks.

How true.

-- Marge


Monday, December 09, 2013

Digital art up for auction

A recent article in TIME Magazine, "Digital Art Clicks on the Auction Block (subscription needed to read the whole article)," clued me into a new phenomenon -- selling digital artwork as, well, art with a capital A. Curious, I checked out the artists and pieces mentioned.

Rafaël Rozendaal, who could be labelled 'internet denizen', does screensavers, web sites, haiku, and more.  'If no yes.com' is the site that was offered for auction (be sure to click on the page to see it interact).  Apparently the artist has been selling sites for a while: "Artist Rafael Rozendaal Sells Web Art Through Domains." And apparently 'If no yes.com' was purchased by Benjamin Palmer & Elizabeth Valleau.  You can find a report on this purchase and past exhibits of digital art at NPR
***
image:  artwork by Rafaël Rozendaal
Rafaël Rozendaal, ifnoyes.com, NPR
***

More about the auction is on the Tumblr page for "Paddles On," where the other artists and their submissions are listed.

Another one of the pieces being offered is a YouTube video via webcam, titled "rgb, d-lay," by Petra Cortright.  According to the TIME article in the magazine, she
markets her work with an equation: video's current view count x amount per view = total current price. That encourages collectors to keep circulating the artwork online to increase its value.
The video is not available for showing here, but you can find it at YouTube.

An artist of note is Wade Guyton, who prints his digital art with an Epson ink-jet printer for showing in a gallery.  According to the Wikipedia article about him --
As of 2013, Guyton's works regularly sell for more than $1 million at auction and privately.  An untitled Epson UltraChrome inkjet on linen of 2005 established an auction record for the artist when it sold for $2.4 million at Christie's New York in 2013.
Here it is.
***
image: artwork by Wade Guyton, untitled (2005)
Wade Guyton, untitled (2005), Petzel Gallery
***

Now, if I can just convince myself that I can do art for money.

-- Marge

Monday, October 07, 2013

Art: Running, jumping and staying steady

The world around us is constantly in motion, yet images of static subjects -- subjects posing or caught in a still -- prevail.  Placing your subject in an off-balance position can suggest motion.  But without getting into animation, how can you really depict motion?  Gifs of photos, in my view, are animation.   The site Artsology gives some examples of artists who have attempted to indicate motion.  Do you think they succeeded?

Returning to the idea of placing your subject in an off-balance position, it seems to me the position should be valid for the subject.  With that in mind, I turn to YouTube for examples of motion.  Take a look at this playlist for examples, some are also shown here.

One of the best examples I found is a cheetah running.  There is a video by National Geographic on this topic that shows what technology was used and how it was set up.  Since it's almost 20 minutes long, here's a shorter version, posted by geniemist:
***
***
For a horse running, prancing, and just being spectacularly horse, take a look at this:
***
***
In addition to cheetahs National Geographic offers a film about frogs jumping:
***
***
And last, but not least, how about the thing with the chicken's head being steady, while the body moves (if you'll note, it's true of the cheetah above, too):
***
***
Be sure to check out the channel Smarter Every Day -- lots of good stuff.

-- Marge


Monday, July 29, 2013

Taking it to the street

While watching a video about spray painting techniques the other day, I realized that the artist was working on the street somewhere in Asia and that doing artwork on the street has elements of theater.  Wanting to know more about this aspect of art, I turned to Google search.  However, a search on 'street art', yields graffiti (tagging).  Zeroing in on the term 'street performer', I go closer but still not quite there.

But I did find an interesting article, "5 Crazy Street Performers (Who Happened to be Geniuses)," at Cracked.com.  The 5 performers are shown below, but please be sure to read the article -- it's well-written and a hoot.  Here's a sample of the writing, this part about Moondog:
A lot of street performers start off with a hard luck story, and Thomas Louis Hardin, or Moondog, was no exception. He was blinded by dynamite at age 16 ... aaaaand that's where his hard luck ended. Because despite performing with made-up instruments and making his living on sidewalks, Moondog was apparently a really influential musician. And also a little bit of a genius.
These videos of the performers were found on YouTube.

The first is Charlie Barnett, a contemporary of Richard Prior and Eddie Murphy, and mentor of Dave Chappelle.  Here he's performing in New York's Washington Square Park.  (Alert: rough language.)
***
***
Then there's Moondog, who had Benny Goodman testify on the quality of his musicianship and performed with Julie Andrews.
***
***
The story of Guy Laliberte -- accordian player, stilt-walker, and fire-eater -- who originated Cirque du Soleil is, well, inspiring.  Here Barbara Walters interviews him.  (Note:  ABC is exerting its copyright claim, don't be alarmed.)
***
***
Here's a visual report on what happened when a world-class violinist, Joshua Bell, played at a metro stop at rush hour as an experiment.  (Looks like the video went viral.)
***
***
Then there's the guy with flaming whips, Adam Winrich. 
***
***

Give a cheer for YouTube.

-- Marge

Monday, July 15, 2013

Artists' studios online

The original idea for this post was offering information on webcams in artists' studios.  Apparently the idea is passé, since most of the links found were broken or hadn't been updated for a long time.  Ustream/art does offer some current live studio feeds.

Two exceptions to the lack of accessible webcams are Ai WeiweiCam (has an interesting back story) and Damien Hirst's site, which features timelapse videos taken in his studio.  I guess watching art being created realtime is as interesting as watching paint dry (if that's a pun, it was intended).  Here's a link to one of his works being created, "Monochromatic Sectors from Primary, Secondary & Tertiary Colour Ring, Dark Centre."

Weiwei's studio cam story goes like this: Chinese Artist Ai Weiwei Installs Webcams in Studio. Twenty-four hours later, China Pulls Plug on Artist's Webcams.  However, it looks like his cam page is still live (but slow) and it offers his twitter feed.

It seems the majority of artists have moved to YouTube.  While I was looking around, I found some interesting stuff about painting techniques.  You can take a look at what I found in this playlist.  Here's a sample, one by pdranitsin:
***
***
-- Marge


Wednesday, July 03, 2013

DIY: easy, affordable wall decor

Today we'll be venturing a little deeper into artwork via projects and techniques using acrylics.

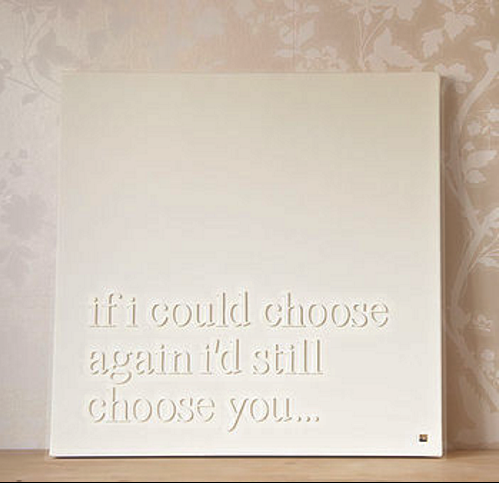
Use gesso for this example of raised letter art. First published on Pinterest, the idea has been expanded by Kelly at View Along the Way.  Note that the appearance of the artwork will change with the angle and color of light in the room.
***
image: raised letter art from Pinterest via View Along the Way
***
With acrylic paints, painter's tape and a stretched canvas, you can achieve something like the following, depending on what colors you choose and patterns you tape.  You may also choose to distress the painting by sanding it, splattering it with a contrasting color, or using some other technique (YouTube is a great resource for acrylic painting techniques).  Refinery29 has a how-to on this; be sure to look at the comments for some good tips on how to work the painting.
***
image:  taped painting technique from Refinery29
***
This third idea was found at Apartment Therapy, a site with many good suggestions for sprucing up your apartment or home.  Here's a link to Amazon for pricing the ceiling medallions; I've seen ones like them in local hardware stores.
***
image: ceiling medallions as wall art from ApartmentTherapy
***
If you find yourself hungry to delve into painting effects deeper, here's a video by Mark W. of ExploreAcrylics showing us how to achieve the faux effect of marbling.  You'll probably want to tape the edges of the canvas on this one or finish them with strips of lath.
***
***
Venture well, keeping in mind that 'mistakes' are O.K.

-- Marge

Monday, June 03, 2013

DIY: YouTube channel art, adding text

Continuing with the previous post about YouTube One Channel art, today we will be adding text.

After opening the GIMP file and before starting to use the text tool, show the template layer by clicking on the eye in "Pasted Layer" ("Layers - Gradients" panel).  To use the template for sizing and positioning the text as desired, set the visibility to about 25%.  The Opacity control is near the top of the panel, just above the Lock button.  (Remember that the content has been merged with the background.)

Invoke the text editor by clicking on Toolbox/"Text Tool" (A big letter A about 11 rows down).  Click in the image area and type a word or two, then hold down your shift key and arrow back over what you just typed to select it.  In the "Change size of selected text" (instruction seen when you mouse over the input field), enter or select the size you want.  I set mine at 100 pixels.  In the "Change font of selected text" field, type the first letter of the font desired and a dropdown of available fonts will show.  If you want to see more of the available fonts, backspace (in the select field) and type in another letter.  The number of fonts available will depend on what you have installed on your computer.  Because I have a number of graphics programs, my list is extensive.  If you can't find a font you want to use, fonts are available online to buy or download free.

Selecting a font that suits the work can be challenging.  I finally settled on AdLib WGL4 BT.  To exit the "Text Tool," select another tool -- the "Rectangle Select Tool" is probably the safest choice.  To revise your text, reselect the "Text Tool" and highlight the text once again.

To position the text, select Toolbox/"Move Tool."  After checking that you have the layer with the text you want to position selected, place your cursor directly over the text, click and drag.  If you accidentally move the layer beneath, Ctrl+z will fix it.  My text is in two separate layers so that each can be positioned separately.

With the text layer selected you can add a drop shadow by selecting Filters/"Light and Shadow"/"Drop Shadow." A dialogue appears.  I set the Offset X and Offset Y to zero, the blur radius to 45, opacity to about 70%, and the color gold for the effect you see below. 


With the Offset X and Offset Y set to 10, the blur radius to 12, opacity at 50%, and the color bright green selected, you see the effect below. 


Note that you can copy a drop shadow to another layer with Filters/"Repeat 'Drop Shadow'."  Also you can revise the drop shadow with Filters/"Re-Show 'Drop Shadow'."  Be aware that each time you revise a drop shadow a new sub-layer is made for that text layer.  The sub-layers can be deleted by right-clicking and selecting "Delete Layer."

This is what the work looks like now, with template.  Notice that the text isn't exactly centered.  I'm not sure whether this will work or not, but will have to wait to test it.


To export to a file format that can be posted, begin by hiding the template (click the eye on "Pasted Layer."  Now select File/"Export to..."  The default file format is "dot png" and a good choice.  Accept the options (they're OK) offered by clicking "Export."  This is the final product:


Seems to me the content should be blended a little better and corners rounded, but that's a topic for another day.

-- Marge


Thursday, May 30, 2013

DIY: YouTube channel art

The other day I took a look at what's needed to add channel art to my YouTube One Channel page.  It wasn't long before I was confused (it sometimes doesn't take much).  When you sort it out it's not too bad, though.  You need:
  • an image that's formatted to show well across displays in wide variety of sizes-- from TV to mobile phone.
  • a Google Drive account because YouTube One wants to get its image from online storage (15 Gig of free storage is available).
Apparently the process for adding an image to your channel isn't functioning yet; here's the error message I get when trying to access the image uploaded --
There was an error!
Details:
The feature you requested is currently unavailable. Please try again later.
Be that as it may, setting up the image is fairly complicated, so a head start would be good.  Be sure to read the guidelines and get the template first.

What follows is a simple how-to on working with a template and conforming to requirements for image dimensions.  Note that I'm working in GIMP -- an application that is fairly new to me -- because it's open source (Windows download page).  While open source is free to use, it's only fair that you contribute to the project in some way.  Because I'm a new user of GIMP, I don't know all of the features and how to make them work. So here goes.

When you open newly-installed GIMP, three panels appear.  The middle pane is the one with the menus.  It's best to start a new image with the dimensions and resolution of the final product.  For YouTube One set the dimensions to width 2560 px, height 1440 px.  That's pretty big, so set the resolution at 72 pixels per inch (under advanced).  I prefer a resolution of 96 or 150 ppi, because the final product is sharper, but this will be a large file because of the image dimensions, so best to stick to 72 ppi, which is the default for most web images.  To save yourself some work later, set the background color to black, GIMP's default foreground color (remember this image may be shown on a TV). Set the view to 33% or 50% to see the whole image.

Always remember, Ctrl+z is your very best friend.

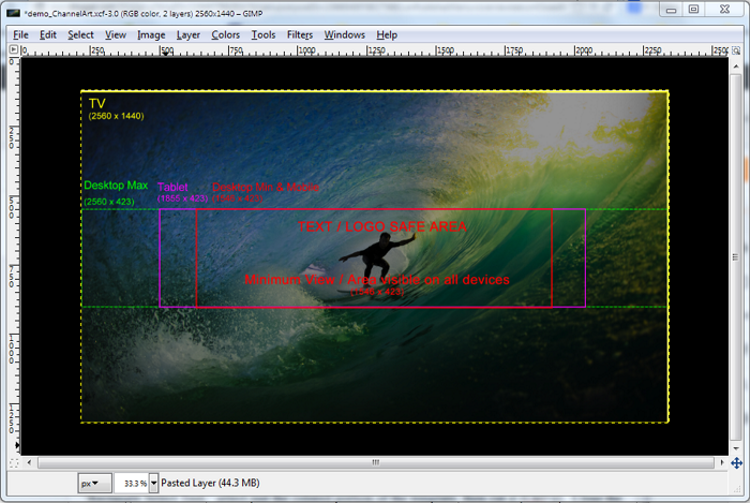
Download the template from the Channel Art guidelines, then open it with GIMP (File/Open).  Using the Toolbox/"Rectangle Select Tool" (left panel, top), select just the colored portion of the template, then cut it (Ctrl+z).  Close the guidelines image without saving, then paste the cut image into your new one.  It will automatically be centered and appear in the Layers list (right panel, top) as a "Floating Selection."  Right click on it and select "To New Layer."  This will be your reference for the placement of the image you want to show in your YouTube channel.  Currently this work looks like this:


Now you need some content.  One of my favorite resources is Hubble images, where I selected the view of M106 wallpaper, 2048 X 1536 (1.2 Mb).  This one was selected because it has a compelling center image and not a lot of 'noise' (small details that distract the viewer's eye).  Note that the dimensions of this image differ from the one I'm working on, in other words it won't fit.

Open this new image with GIMP, select it all (Select/"All"), cut it and paste it into the work.  In the Layers list right click on "Floating Selection" and set it "To New Layer."  Being sure you have "Pasted Layer #1" selected, choose the Toolbox/"Move Tool" (five buttons down) and position the new image so that the portion you want in the center is in the center.

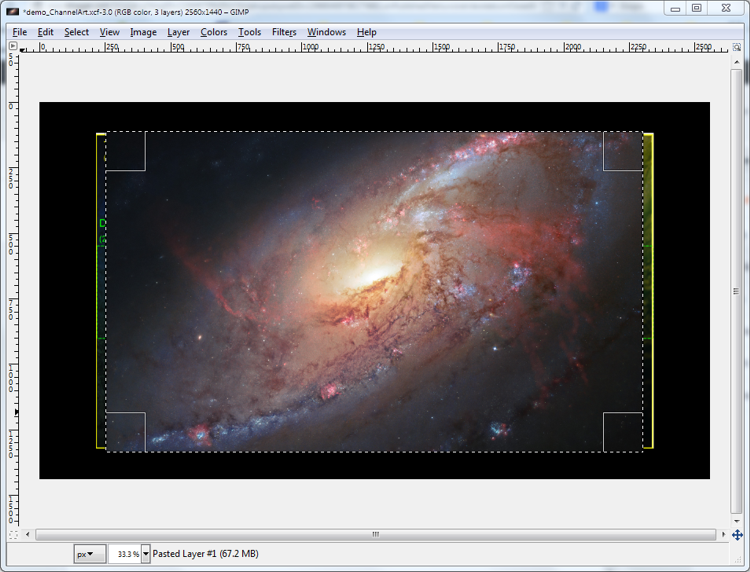
Because the image doesn't fit correctly, it's necessary to crop and blend it.  Being sure that you have the correct layer selected, use the Toolbox/"Rectangle Select Tool" to select the size you want, then use Layer/"Crop to Selection." Remove the selection by choosing Select/"None."  Now we have this:


Now to blend the content with the background.  Hide the template by clicking on the eye next to "Pasted Layer" in the Layers list.  Re-select the content layer (Pasted Layer #1) and drag it down to just above the background.  With Layer#1 still selected, right-click and choose "Merge Down."  Using Toolbox/"Rectangle Select Tool," select an area within the layer.  (I like to use View/"Show Guides" and drag the guides from the ruler for reference.) What we have now is shown below.


Invert the selection with Select/"Invert." By clicking Filters/Blur/"Gaussian Blur" you will get a dialog for setting the blur parameters.  I tried setting it to 75px and that worked well.  Turn the guides off by deselecting View/"Show Guides" and remove the mask with Select/"None."  This is the final image.


There's still text to be added and the work needs to be exported.  Because this post is so long, these topics will be addressed in the post on Monday.  If you have questions or want to advise on better ways to use GIMP, please be sure to leave a comment.

-- Marge